Quantcast
Channel: Woodworking Projects at LumberJocks.com
Viewing all 73864 articles
Browse latest View live

elm slab headboard and cherry platform bed

$
0
0

elm slab headboard and cherry platform bed

completed this project in early 2010 . Lots of metal and 3 form cabinets in the bedroom so we decided to give a bit of organic feel to balance that out. headboard is 2 consecutive elm slabs that measure 101” in length approx 55” in width when put together. All elm was a victim of dutch elm blight and was destined to go the landfill before it was “rescued” by my sawyer. nightstands cantilever off teh lower slab and have a single door with sycamore panel.

thanks for looking


Cradle for my first Grandbaby due in Sept 2011

$
0
0

Cradle for my first Grandbaby due in Sept 2011

I am building this cradle for my first grandbaby who is due in September. I first saw the plans for the cradle in a 2007 edition of Wood magazine and thought what a wonderful gift that I could build in the woodshop. I decided to build it out of walnut and finish it with wipe-on poly. Being that both of my son’s are very tall I did make a few changes to the size, 4 inches longer and 2 inches wider. I first created templates out of MDF so I could use my router and template bit to duplicate the parts. This way I am sure to make the parts match and greatly speeds the process after the templates are built. It really makes the through tenens easy to fit. I am sure this will not be the last one I build. What I really like about this design is that it uses through tenens that are pinned and can be knocked down for easy storage and transport since my son lives on the other coast.

When I first put it together I did not like seeing the heads of the carriage bolts so decided to cut a wooden cap using a hole saw without a pilot bit and glued them to the bolts. This was a nice touch.

I finished it with a couple coats of Watco danish oil and 4 coats of Shellac. I then rubbed it out with 0000 steel wool and a coat of paste wax.

Almost done, I just need to do a little fitting of the pins that hold it all together.

See all of my cradle photos at http://pavswoodshop.com/mathew/pages/cradle.html


Ladder Back Chair and Sowing Rocker

$
0
0

Ladder Back Chair and Sowing Rocker

Here are the latest two chairs I have salvaged. Both chairs were very rough and had been exposed to the elements for many years but were basically sound. I wove a Herringbone pattern in the rocker seat from flat reed and gave it a complete refinish in an Early American Minwax stain. The ladder back chair is not as old and had a good White Oak seat. I repaired and hand sanded the chair then cleaned the Oak seat restoring its color. They both got a finish in Tongue oil including the seats. The rocker was finished off with a funiture wax.


Sky hook

$
0
0

Sky hook

A few years ago, one of my buddies at work handed one of these to me. He called it a sky hook. He said to balance the small end on the tip of my finger. Of course, I could not. Then he took off his belt, stuck it into the groove in the wood, and balanced it all on his fingertip.

He said his knucklehead 14 year old boy made it, and if he could then anyone could. This is the worst kind of challenge to me. I cannot win, I can only do as good as a 14 year old knucklehead. No offense intended to any 14 year knuckleheads.

Sure enough, it works as advertised. I made this out of oak, but I have made others from different woods.

I hope that the last image is suitable to make a pattern. If not, let me know. You will need to make the groove slightly bigger than the pattern. I traced around it, the pencil point could not get in completely.

4” x 3/4 ”, but I have made other sizes by using a copier to enlarge .

Are you up to the challenge?


KITCHEN ISLAND

$
0
0

KITCHEN ISLAND

I have so many pictures of this project I wanted to post this as a series like so many of you have done and I have enjoyed. But doing it after completion seemed a little dishonest and I probably lack the technical expertise to do it. I will give it my best effort in this format.

My wife and I had been talking about an island in the kitchen for a few years and finally came up with a plan that included as many features we wanted as we could cram into it. We studied what was available, drew up plans and I sprang into action…... last fall.

We wanted it to resemble a table so I built a table frame added a base and a 60/40 center cabinet section with large drawers on one side and shelf storage on the other. One end has shelves for cook books and the other has pull out vegetable bins, compost can and spice tray for large spice containers. The large drawers on the side hold large pots and pans.

The table top has cabinets on all four sides. One drawer is a spice tray with a rack to organize the bottles and make them easier to get out. One will be a knife drawer and the others are for various kitchen tools.

Drawer boxes are finger jointed with 1/8th inch Luan bases. The project is built of Clear or Sugar pine as some people here call it and the center cabinet is 3/4 inch plywood.

I ordered the legs about 5 years ago when we decided to have a center island. They have been taking up space in my shop. (I work fast don’t I?)
The drawer all ride on Accuride slides, most of which came from Rockler until I found a less expensive source.

The top I ordered from a manufacturer in Michigan. It measures 60×40 inches, is top grade hard maple 1 3/4 inch thick for commercial kitchens and came pretreated. It was so well crated I used the crate lumber to build a shop cabinet for my drill press.

I sprayed semi-gloss white enamel with the door and drawer bead board panels painted in the pale yellow shade of the kitchen walls.

It is a great size for the space and a perfect height for working. We both love the result and it is a focal point in our unfinished kitchen.


Incra cutting table

$
0
0

Incra cutting table

Hi Guys!

This is my second “incra” project. I really learned a lot with it, had several problems, so trying to get ready for the next one!

1.- the first time I tried this project my chinese saw didn’t want to cut the hardwood without burning (1,5 inch height). After some reasearch the problem was in the machine (direct drive) so sold it and buy a new one this time a dewalt, with incra compatible miter channels. so started again.
2.- I didn´t have a thickness planner, and my hand planning skills are not developed yet, alse preparing stock for cutting was a pain, so the general quality is poor. (I have one now, and can see the difference)
3.- I didn´t have good clamps, just 4 quickgrip, but they cant make enough force, so there is some gaps between th strips.
4.- I did´t have a thin kerf ripping blade, so with the general blade it was a lot of waste and the finish of each strip was not so good.

After this experience it was really nice project to build, learned more about my incra positioner and enjoyed it´s easy of use.

Woods are inciense and guatambu (local south american) finished with homemade beeswax

thanks for your comments!


Platform Bed

$
0
0

Platform Bed

So, after abandoning my plans to make a king sized bed frame (lack of tools, experience, patience etc.) I came up with this plan for a platform bed. Due to height limitations in the loft where the bed is, I made it to sit on a “platform” of 2×2” wood, and have this covered by a frame, as you can see from the pics. The frame is oak with cherry 3/4 ply. Each section comes apart. Finish is a Minwax pre-stain conditioner followed by two coats of oil and two coats of brush on poly. I have mixed feelings about the result. It is my first large scale project as a ww, and took a lot more time and effort than my other small projects. As well, the design was completely my own. I was able to learn some new skills with the router and used a newly tuned up handplane for the first time. However, I see a lot of areas that I could have improved; the frame is not as tight to the boxspring as I planned, and I am not very satisfied with the way that the finish turned out; the brush on poly turned out uneven and slightly blotchy, despite a thorough sanding b/t coats. Anyways, it is a good start for me, although it gives me some things to work on for the future.


Ben's tractor bed

$
0
0

Ben's tractor bed

After seeing the bed Neil Davis built for his grandson, I thought I would post the tractor bed my Dad and I built for my son. He is a tractor nut but is especially crazy about John Deere. The bed is modeled after my Dad’s 4310. The body is made of MDF and the roll bar and front is made from pine. My son takes pride in showing everyone that the lights really do work. It is very heavy and had to be assembled in pieces. Like so many of my projects, I built it about 400 times in my head before actually starting. My Dad who is brilliant woodworker built the wheels. I just had to tell what I wanted them to look like then stand back and be amazed. This was a lot of fun to design and build but more important my son loves it.


Two Silly Segmented Projects..'objets d'art'

$
0
0

Two Silly Segmented Projects..'objets d'art'

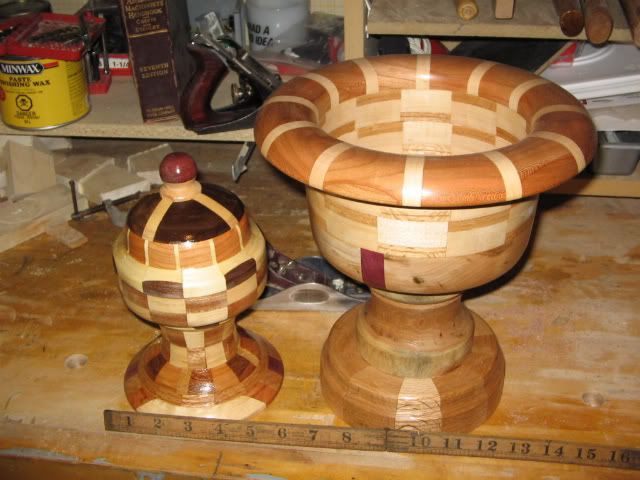
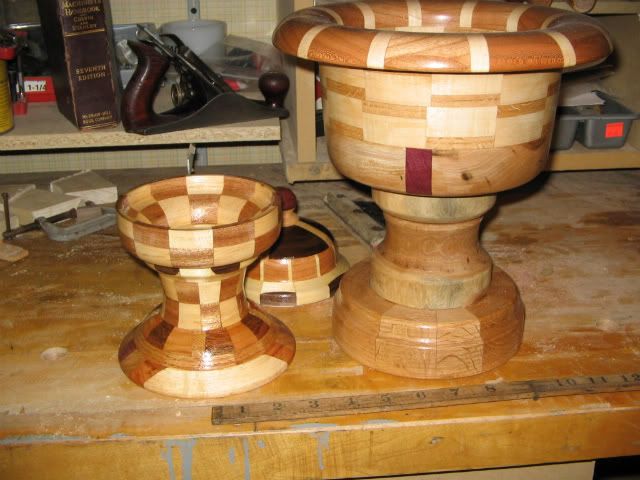
Two projects which I’ve been working on, now complete. Both of these have been featured, more or less, in my recent forum postings about Chucking methods, and segmented assembly tips. Well, here they are, the item on the left is, well..? A jewelry box, covered candy dish, or bedside container for your false teeth. The item on the right is a Greek urn,(awright, Roger Clark), mortar sans pestle, or spittoon! These items were created with no clearly designed style or purpose in mind, mostly built so I could get the hang of segmented joinery and hollow-form techniques on the lathe. Photobucket Photobucket
Heyyy.. that’s my new #2 plane lurking in the background! How did it get there, I wonder? There’s 149 pieces in the covered one, 88 pieces in the one on the right. I really did use up a lot of waste stock and marginally useful materials this way. Poplar, purpleheart, walnut, mahogany red oak and maple, a Mulligan’s stew of wood species. Hope you like these projects!! Now…these two were fun, but it’s time to clean up the shop and get busy with some serious projects.


Miniture router plane

$
0
0

Miniture router plane

Not made from wood but for wood. Design to make inlay, highlights or groove and dado in small boxes (puzzle boxes). 1/8 and 1/16 blades are made from 1/8×2 square tool bit from Busybee store (on the third picture the packaging label is wrong). One side of the bit sharpened to less then 45 degree and the other side to form double scoring knife. Overall, works well on soft and hard but not grainy wood.
Cheers,


Burr Elm Table

$
0
0

Burr Elm Table

This table was produced for two friends who are keen supporters of the arts. The table was inspired by the work of Scottish artist and woodworker the late Tim Stead. The design is the brainchild of my friends – my role was simply the technical aspects of the design. They were keen to get involved in the build process and undertook a great part of the execution of the work. My favourite picture is the final one showing the table being used for the purpose for which it was designed – a meeting place for friends.


Shaker Clock

$
0
0

Shaker Clock

This was my first clock project. Have always like the simplicity of shaker design. The proportions and general design was from a photo of shaker clock shown on the cover of Canadian Home Workshop magazine. I chose a simpler hand design to keep it plain. It is constructed of all cherry. I have been collecting a lot of cherry short lumber and decided that clock projects would be a good use of this lumber.


My First Cabinet

$
0
0

My First Cabinet

After using a small table in the kitchen for the last few months my wife expressed a desire for a kitchen island. With her input I designed and proceeded to build this cabinet. I learned a lot and hopefully will do better on my next cabinet. Photo 3 is of the backside—there are doors on both front and back. The top is made from leftover oak flooring. I hope you like it. My wife does! I guess that is what counts.


Tool chest ? ....

$
0
0

Tool chest ? ....

The chest is made out of cedar, salvaged from an old corner cabinet disassembled 20 years ago when we moved to our current house. Fortunately I kept the lumber in the attic for all this time.

I have been researching for a tool chest since a couple of months ago. (I don´t know why surfing the web is now called research)

I finally decided for a chest similar in size to Gerstner 92XL , but I didn´t like the fact that upper drawers are partially hidden by the front rail of the chest. So I made the upper case copying from DocK16´s blog (Woodsmith 183)

Overall measurement of this tool chest (HxWxD)
Cm 47×60x33 ( 18.5” x 23.5” x 13”)

Top compartment cm 8×56 x 26 (3.125” x 22” x 10.25”)

Drawers
(4) cm 4.9×9 x 27 (1.93”x 3.5” x 10.625”)
(6) cm 16.5×3 x 27 (6.5” x 1.2” x 10.625”)
(2) cm 16.5×3,5×27 (6.5” x 1.4” x 10.625”)
(2) cm 56.5×4.5×27 (22.25” x 1.75”x 10.625”)
(1) cm 56.5×6 x 27 (22.25”x 2.375” x 10.625”)
Total 15 drawers

Total empty weight : A lot. This type of tool box should be placed on a roller chest.

I started building this chest by beginning of March this year. So at the end it took me 6 weekends as average.
A lot of distractions, besides daily work for a living, business trips, etc. Suddenly I was required to make and finish a couple of presents, such as the chessboard.. I still have one in progress.

Cutting the boards left quite a lot of scrap. Almost all the miter ends.

Meanwhile I saw Woodworker’s Journal video. Couldn´t resist to build my Tambour Box from the corners leftovers. A fun distraction indeed.

One of the toughest parts was planning the measurements, and the cuts. Despite I choose a nice curly cedar for the small drawer fronts. I needed to redo some of them, and lost the nice continous grain pattern. (It could be worse)

For the measurements, I picked up Gertsner measures, and made the carcass. Measures of the drawers were taken from the dry assembled case.

I include a style and rail horizontal drawer separator dadoing the sides of the carcase. I did also make 3 vertical separators for the small drawers.

Trying to get aligned the drawers as much as possible was also a challenge. Got to get things right in four dimensions. Length, width, depth, and grain pattern !! I almost forgot about that. Knowledgeable people only concentrate in grain and design. I need to concentrate in the basics, just to say to protect my fingers. (Still a long way to go)

Drawers are standard tongue and groove jointed, and lined up with green vinyl.

Lid is box jointed in the sides with a mitered inlay in the borders. Piano hinge and neumatic support.

I know, that piston has nothing to do with this stile. But I liked the way it worked. I may change it in the next one.

Hope you enjoy.


Another end grain cutting board (3 woods)

$
0
0

Another end grain cutting board (3 woods)

Made these two for my sister while she was here visiting last summer. Woods are wenge, maple and jarrah. Design was a bit of a f*#& up. Finished with a combination of mineral oil and beeswax.


Maple Futon.

$
0
0

Maple Futon.

This here is the second project i started my second year in woods at school. It took me about 2 months to complete.. and thats what one hour a day working on it.. I decided to make it out of maple.. Being strong and not as heavy, like if i would have made it out of oak. I finished it with a tung oil and 2 coats of polyurethane. Turned out nice id say. I got all the roller’s from rockler.com. I was a great project. very stong as well.. I can fit 4 of my big friends on it with no problem.. I use it in my man cave. :)


Mail/Key Holder.

$
0
0

Mail/Key Holder.

Hey there, at school last year messing around with the CNC router. I came up with a mail/key hold for my room. Nothing to complex here. little black walnut and maple. Enjoy


Dove Tail Box

$
0
0

Dove Tail Box

Woods Teacher said that we needed to make a project using a dovetail. Whats better than making a nice box. Enjoy


Fun Time !!!

$
0
0

Fun Time !!!

Yesterday was our woodturning club’s spring turning day. We had a great time yesterday. I asked a fellow woodturner to teach me how to make a whistle that actually made a sound (more so a pleasant sound, you like a whistle is suppose to sound like). He made the whistle on the left to show me the basics and I found out that my problem was in shaping the reed for the whistle. I made the whistle in the middle yesterday and it worked. So today I had some laminated stock and made the whistle on the right. Left whistle – Mahogany, middle whistle is maple, right whistle is purpleheart and maple, all are about 3” long.

These are fun !!!


Step Stool.

$
0
0

Step Stool.

Step Stool. one of the first projects i had to make in year 1 of woods. this is where it all started.


Viewing all 73864 articles
Browse latest View live


Latest Images